You are here: 1. Distribution System > 1.3. FILE Menu: Master File Maintenance > 1.3.15. File - Warehouse > 1.3.15.7. File - Warehouse - Bins

File - Warehouse - Bins

Micronet allows you to setup multiple bin locations for each warehouse. These are physical locations in your warehouse.

Using multiple bin locations allows you to track the exact location of items currently in stock. When printing picking slips, slips can be sorted by, and show, the bin location to assist with correct picking of goods. This means that goods can be despatched from your warehouse to your customers more efficiently because warehouse staff know exactly where to find the items they need.

An item can be stored in multiple bins or different items in the one bin.


Technical Tip

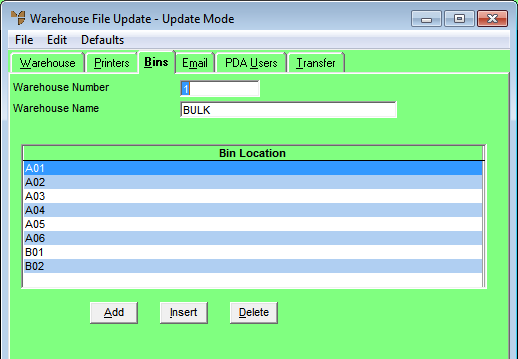
  • You can only display this tab if multi bins are enabled in your Micronet system. Multi bins are enabled using the Allow Multiple Bin Locations per Item field on the Inventory Configuration screen – see "Edit - Program - Inventory".
  • If you can't access this tab, you can also enter new bin locations using the Bin Location Maintenance program – see "Bin Location Maintenance - New Bin Locations".

To add or edit warehouse bin details:

  1. Add a new warehouse or open an existing one.

Refer to "Adding a New Warehouse" or "Updating a Warehouse".

  1. Select the Bins tab.

Micronet displays the Warehouse File Update screen - Bins tab showing all existing bin locations for the warehouse.

  1. If you want to:


Technical Tip

2.8 Feature

If you try to delete a bin that either has stock or has transactions pending, Micronet displays a message. You need to remove the stock or cancel the transactions before you can delete the bin.

If you selected to add, insert or edit a bin location, Micronet displays the Warehouse Bin Locations screen.

  1. Complete the following fields:


Field

Value


Bin Location

Enter a unique ID for the bin location, up to eight characters.


Dimensions - Height, Width, Depth

The dimensions are reference fields only.

Enter the height, width and depth of the bin in metres.


Max Weight Capacity

Enter the maximum weight load for the bin in your preferred weight units, e.g. kilograms or tonnes. This is a reference field only.


Quarantine Location

Select whether the bin is a quarantine location. The options are:

  • Yes – the bin is a quarantine location; Micronet will not automatically select stock from a quarantine bin
  • No – the bin is not a quarantine bin; Micronet will select stock automatically from the bin.


Location Type

2.8 Feature

This field replaces Quarantine Location in v2.7.

Select the type of bin location. The options are:

  • Normal – the bin is a normal bin location; Micronet will select stock automatically from the bin
  • Quarantine – the bin is a quarantine location; Micronet will not automatically select stock from a quarantine bin
  • Cross Dock - the bin is used to hold received items that have been pre-allocated to orders
  • Pre Picked - the bin is used as a temporary holding location for partially picked orders.
  Zone

2.8 Feature


  Sort Sequence

2.8 Feature

If you want items on a PDA to be sorted in a specific bin location order, rather than just alphabetically by bin number, enter the sort sequence number for this bin.

For example, this screen shows the default (alphabetical) sort order for the following bins:

If you would prefer these bins sorted, say, by the way they are arranged within the warehouse, you might enter the following sort sequence for each bin:

  • A01 - 1
  • A02 - 5
  • A03 - 2
  • A04 - 6
  • A05 - 3
  • A06 - 7
  • B01 - 4
  • B02 - 8

The bins would then be displayed on the PDA in the following order:

  • A01 - 1
  • A03 - 2
  • A05 - 3
  • B01 - 4
  • A02 - 5
  • A04 - 6
  • A06 - 7
  • B02 - 8


Picking Priority

2.8 Feature

If the Use Bin Priority Range field on the Inventory Configuration screen is set to Yes (see "Edit - Program - Inventory"), select the zone for this bin from A to Z. Depending on the zone selected, Micronet will automatically assign a bin priority within the range for that zone (e.g. C = priorities 201-300) when an item is first picked from the bin.


Receipting Priority

2.8 Feature

If the Use Bin Priority Range field on the Inventory Configuration screen is set to Yes (see "Edit - Program - Inventory"), select the zone for this bin from A to Z. Depending on the zone selected, Micronet will automatically assign a bin priority within the range for that zone (e.g. G = priorities 601-700) when an item is first receipted into the bin.


Technical Tip

Note that if you are importing the values into these fields, the values are 0–25 and not A–Z. The fields to import into are WAREHBIN_PICKRANGE and WAREHBIN_RECRANGE.


Default Credit Location

2.8 Feature

Select Yes if you want this bin to be the default bin for stock returned via credit notes. You can only set one bin per warehouse as the default credit location.

If you set the Default Credit Location for a bin to Yes, Micronet will automatically change this setting to No on any other bins for the warehouse that are set to Yes.

To use this feature so that Micronet automatically selects the default bin for returned stock, you need to tick the option to USE DEFAULT BIN LOCATION on the Credit Creation screen – see "Credit Creation - Edit - Use Default Bin Location".

  1. Select the Accept button.

If you selected to add a bin location, Micronet redisplays the Warehouse Bin Locations screen so you can add further bin locations.

  1. When you have finished entering bin locations, select the Cancel button.

Micronet redisplays the Warehouse File Update screen - Bins tab showing all the bin locations for the warehouse.

  1. Select FILE | SAVE.